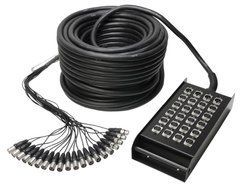
Channels and returns
Count microphone inputs, line sources and return connections to the stage. A 12 Send + 4 Return label describes the connection layout rather than identical functions at every socket. Check connector gender, labelling and breakout length.
Working length
Allow for the route to the mixer, access ways and space around the stage. Consider coil weight, transport and strain relief at the stagebox. An analogue multicore does not replace a digital stagebox without suitable conversion equipment.
Connectors and wiring
Note both device models, the input and output labels and the required signal direction. Compare contact count, wiring and port function as well as connector shape. An adapter with matching plugs does not necessarily convert the signal.
Length and working conditions
Measure the actual cable route with a modest allowance at the equipment. Stage use calls for flexibility, strain relief and convenient coiling; permanent installations require cable suitable for the installation conditions. Observe the distance limits of the selected interface.
Check the supplied item
Confirm whether the item is a finished cable, cable sold by length or a dedicated accessory. Check both ends, length and the exact part number. Test every channel at its operating level after connection and label cables by function.
Start with the stage channel list
Before choosing a multicore, list sources that must reach the console simultaneously. Count individual outputs rather than performers: stereo keyboards may need two channels, and several microphones on one instrument require separate lines. Record channel numbers, source names and connection points. Add a justified allowance for realistic changes in the lineup. This is more useful than choosing from musician count or the apparent size of a stage box.
Count signals returning from the console to the stage separately. These may be suitable line level connections to appropriate equipment, but their function follows the system diagram. Do not combine input sources and returns into one total. Give the specification two groups: towards the console and back to the stage. Identify connectors and equipment at both ends of each. Retain the list so it can be revised after a lineup change.
Send and Return in the actual assembly
Warwick describes RockCable stage box assemblies using separate Send and Return counts. This helps assess channel allocation, but a purchase still needs the wiring arrangement and connector details. The SoundsGood catalogue lists Soundking AH103, AH104, AH105, AH106 and RockCable RCL30930 in different configurations. Compare the exact part number rather than only the series name.
A return signal line should not automatically be treated as a cable between a power amplifier's speaker output and passive speakers. Check every port's intended function. Future monitor paths require attention to Return capacity as well as spare Send channels. Extra connections of one type do not guarantee convenient expansion of another. Agree on return names with the crew and keep them in the stage diagram to avoid confusion during a quick configuration change.
Stage box placement and fanout reach
Position the stage box around performer locations and the short leads feeding it. It should remain accessible without obstructing movement or equipment placement. Check that socket numbers are visible in the working position. When source groups are widely separated, assess the complete local cabling arrangement. A long multicore does not eliminate leads between microphones, DI boxes and the stage box. Decide which part of the route each component serves before installation.
At the console end, individual tail length and access to all required inputs and outputs matter. A short fanout may not reach another rack device even when the main cable is long enough. Avoid stretching one branch across the workspace. Draw the console and nearby equipment positions and confirm the tail arrangement before ordering. Support the main cable so its weight does not hang from individual connectors. Service access should remain possible when the complete system is connected.
Routing and transport
Measure the stage to console path along the actual route, following permitted passageways, furniture and designated crossings. A straight line across the audience area may not be a usable path. Allow a modest amount at both ends for equipment placement. Agree on the route with the venue before setup, especially where staff or audience members circulate. After deployment, confirm that normal operation does not create tension. Consider access for removal after the event too.
A touring system needs an assessment of total weight, packed size, transport space and storage for the stage box and tails. Coil according to the cable requirements without treating plugs as carrying handles. Protect connectors from impacts against heavy equipment. If a separate case or reel is needed, verify dimensions and the intended packing method. Do not assume the accessory is included without checking the supplied contents. Inspect the box cable entry and fanout areas before returning the assembly to storage.
Check every channel before performance
Match stage box numbering to the console end before use. Test lines sequentially with a known source and suitable receiver. Check returns separately in their required direction. Hearing sound somewhere in the system does not validate all channels. Record results and identify problems immediately so they do not first appear during soundcheck. Update the list after repatching, even when a change seems temporary or obvious to the person making it.
For an intermittent channel, separate checks of the short lead, source, console input and multicore line. Change one item at a time and compare with a working path. Establish how a spare channel will be used without creating ambiguous labels. Do not leave a temporary change undocumented. Rental assemblies benefit from a service history covering affected channels and retest outcomes. This supports preparation for the next event and identifies replacements already made.
Practical selection questions
Can an analogue multicore replace a digital stage box? They are different system components. Check console architecture, ports and stage equipment. A passive cable assembly does not provide digital conversion or network routing. When moving to another transport method, agree on the complete component list before selecting connections. The shared goal of linking a stage and console does not make the solutions interchangeable.
How much channel reserve is useful? Consider actual venue scenarios: another performer, an additional instrument or temporary replacement of a faulty line. Spares must match functions and connectors, not merely increase socket count. Provide the input and return lists, console and equipment models and measured route length for selection. These details allow a configuration to be compared with the full stage task and its supplied contents checked before purchase. Keep separate channel lists for recurring event lineups.
Buy sound equipment at SoundsGood
We can help match sources, channels, speakers, connections and budget. Provide a list of existing devices and describe where the system will operate. Confirm the warranty period and included accessories for each product.
Free delivery applies to online-paid orders from UAH 4,000. Promotional items, promo codes, special-order items and instalment payments are excluded. See the payment and delivery page for full conditions.
SoundsGood supplies sound equipment for educational institutions, studios, concert halls, conference rooms, and public and private organisations. A technical brief can be used to agree on system components, specifications, a commercial quotation, documentation and delivery arrangements.