Stereo placement and mono compatibility
Choose an arrangement suited to the kit and room. After changing height or microphone spacing, check the stereo centre and mono sound. Use stands that hold the microphones securely throughout the performance.
Headroom and attack
Choose a microphone and preamp with headroom for the hardest hits. Frequency response, distance and angle affect the balance of attack, fundamental tone and decay. Adjust drum tuning and placement before applying processing.
Interaction between channels
Listen to each channel separately and with the other microphones. Moving a microphone changes sound arrival time: check the combined tone and mono compatibility, especially after repositioning stands.
Unobstructed mounting
Leave clearance for sticks, cymbals and the player’s movements. Check rim-clip compatibility, stand stability and cable routing. Contact with moving parts can produce unwanted noise.
Inputs and power
Count the microphone inputs and cables required. Condenser models may need phantom power; consult the manufacturer for exact requirements. Check power for every channel and the contents of the selected package.
Decide what the overheads should contribute
Start by deciding whether the pair should capture mainly cymbals or represent the whole kit, including snare and toms. In the first approach, close microphones supply most of the drum sound while the overheads add metallic attack and decay. In the second, the overhead pair establishes the natural balance and individual microphones reinforce selected details. This decision affects capsule direction, height and processing. An especially bright microphone is not automatically helpful with already aggressive cymbals: extra high frequency energy may make the balance harder to manage rather than more articulate.
Ask the drummer to play a normal verse, a loud chorus and a tom fill. Listen for a convincing balance across all three passages. A pair that flatters one isolated crash hit can leave the snare sounding distant during a complete groove. Establish a useful sound from the overheads alone before introducing the other channels. That first recording reveals whether the placement actually suits the player's technique and the arrangement.
Stereo geometry and the mono check
An XY arrangement places the capsules close together at an angle. This helps limit arrival time differences between the channels and offers a manageable stereo image. A spaced AB pair produces a different impression of width but needs careful evaluation when summed. Neither arrangement is a quality rating for the microphones: either can suit a particular kit, room and musical intention. Moving the stands farther apart simply to maximise width is unhelpful if the centre of the kit loses solidity.
Compare stereo and mono at a consistent listening level. If the snare becomes weaker or the cymbals develop an unnatural colour, adjust the geometry and record again. Equal distances from the snare can be a useful starting point, but they do not guarantee alignment for every source in the kit. A polarity switch is not a substitute for placement either: it changes the entire signal rather than correcting an arbitrary timing difference. Evaluate overheads together with close microphones as those channels are introduced.
Height, ceiling reflections and practical placement
Raising the microphones changes the balance of individual drums, cymbals and room reflections. Higher is not always better, particularly under a low reflective ceiling. Lower placement changes those proportions but can allow the nearest cymbal to dominate. Begin where both sides of the kit are represented sensibly and adjust height in small steps. Judge the recording through headphones or in a control room instead of trying to hear subtle differences beside the live kit.
Allow clearance for the drummer's actual stick movements and for cymbals swinging after impact. The stands must support their extended booms, with cables secured so they cannot pull the microphones downward. On stage, check walkways and lighting equipment before settling the position. Record the height, direction and relevant distances for repeat sessions; a photograph helps recreate the setup but cannot describe every measurement. Change one variable at a time so that an improvement has an identifiable cause.
Matched pairs and separately purchased microphones
A dependable stereo image benefits from similar sensitivity and frequency behaviour, not merely the same model name on two bodies. A manufacturer matched pair can simplify achieving that consistency. Two separately purchased examples may also work successfully when tested together. Place them at comparable distances from the same test source, compare level and tone, then swap their positions. This helps distinguish an individual microphone difference from placement or a preamplifier channel issue.
Do not try to correct every difference with panning. Match gain first and confirm that both cables and inputs work correctly. If you intend to expand the setup later, check whether another example of the same version is available. A different revision or a visually similar model need not have the same directional behaviour or tonal balance. For frequent transport, consider how the microphones and their mounts will be stored together and identified during setup.
Power, connections and recording headroom
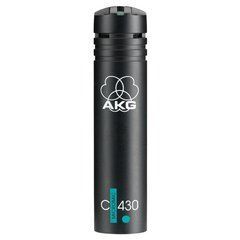
The AKG C430 is a cardioid condenser microphone designed for cymbal and overhead use and requires suitable phantom power. Check the instructions for the exact model you choose rather than inferring requirements from its appearance. An XLR socket on a mixer does not by itself establish that suitable power is available. A stereo pair also requires two appropriate microphone inputs, compatible cables and independent gain adjustment. Mute the channels before connecting and follow the manufacturer's powering procedure.
Set gain using the player's loudest expected hits and allow room for accents. Distortion can occur at several points in the signal path, so lowering a fader after the preamplifier does not necessarily remove it. Use an available pad when necessary and check both channels. Excessive compression while recording can exaggerate the room and alter cymbal decay in distracting ways. Keep a short unprocessed recording for comparison instead of judging every placement through an established effects chain.
Common questions about overhead microphones
Can one overhead record a drum kit? Yes. A mono overhead is useful when inputs are limited or the arrangement does not need a wide image; careful placement remains essential for the whole kit balance. Do I need a separate hi-hat microphone? Not necessarily. Listen to the hi-hat in the overhead pair before allocating another channel. Should all low frequencies be removed? No. Set filtering according to the role of the overheads, since aggressive filtering can remove desirable drum body along with unwanted low energy.
Why does the snare appear off centre? Check geometry, channel gain and panning before reaching for equalisation. Do overheads replace room microphones? They can include ambience, but a separate distant microphone captures a different relationship between direct sound and reflections. What information helps when choosing a pair? Provide room dimensions, ceiling height, available input count and the intended role of the overheads. These details are more useful than seeking a single universally suitable drum microphone.
Buy sound equipment at SoundsGood
We can help match sources, channels, speakers, connections and budget. Provide a list of existing devices and describe where the system will operate. Confirm the warranty period and included accessories for each product.
Free delivery applies to online-paid orders from UAH 4,000. Promotional items, promo codes, special-order items and instalment payments are excluded. See the payment and delivery page for full conditions.
SoundsGood supplies sound equipment for educational institutions, studios, concert halls, conference rooms, and public and private organisations. A technical brief can be used to agree on system components, specifications, a commercial quotation, documentation and delivery arrangements.