A fresh set of strings can restore a guitar's clear attack, make playing more enjoyable and reveal detail in an accompaniment. A random replacement does not solve every problem, however. Excessive action, an unsuitable setup or a damaged attachment point will not be corrected simply by buying a more expensive packet. This guide explains string selection for steel-string acoustic guitars, from reading gauges to the first practice session after installation. Specific examples are PRS Classic Acoustic 12–53, Dunlop DAP1254 and DAB1254, Cleartone 7412 and the separate twelve-string Dunlop DAP1047J. Specifications are compared with manufacturer information. Tonal descriptions are starting points for your own assessment, not invented hands-on test results or promises of an identical outcome on every instrument. The aim is a compatible, comfortable and repeatable choice.

1. Identify the guitar type first
Acoustic describes how an instrument produces sound, but does not always identify the correct string family. A classical guitar also produces acoustic sound, yet it normally requires a different family from a steel-string flat-top. Record the complete guitar model and find its manufacturer's recommendations before shopping. Do not decide solely from a round soundhole or wooden body. The metal winding on classical bass strings does not turn that set into a steel-string acoustic set. Never fit steel strings to a guitar that is not designed for them. If an instrument arrived without documentation, show it to a technician or knowledgeable seller before ordering. Correctly identifying the construction matters more than choosing a brand because it establishes the compatibility and loading limits. Electronics, body colour or the player's age do not replace this first check. Resolve uncertainty before experimenting with a different string family.
2. Record what is fitted now
The most useful starting point is the previous set's name and your reason for changing it. Keep the packet, photograph its label or make a note on your phone. If everything worked well, repeating the same set provides a more predictable result without an unnecessary experiment. If you want easier fretting, less sliding noise or a different balance, state that specific need. Asking for better strings is too broad to support precise advice. Do not identify gauge by touch alone: a worn string and a fresh one can feel different. If the existing set is unknown, check the guitar's standard specification and assess its present setup. Recording this information helps separate real changes from the novelty of a replacement. Note your tuning and pick as well, since both influence later comparisons. A clear starting point prevents every purchase from becoming another search from scratch.
3. Understanding the label 12–53
A short designation such as 12–53 normally gives the diameters of the thinnest and thickest strings in thousandths of an inch: .012 and .053. It does not reveal the complete set. The strings between those endpoints may have different gauges, so two packets with identical large numbers need not feel identical. For a precise comparison, write down all six gauges in order from the first string to the sixth. A w beside a number identifies a wound string, which is useful when discussing third strings and specialised sets. Do not confuse inch-based labels with millimetres or round values arbitrarily. The full sequence shows whether a change affects only the bass end or the whole set and helps identify an appropriate single-string replacement after a break. If a packet lists only endpoints, find the detailed specification for that exact model rather than a neighbouring series.

4. Why Light is not identical across brands
Extra Light, Custom Light, Light and Medium are useful names within a range, but are not one universal standard shared by every manufacturer. The PRS Classic Acoustic Light considered here is 12–53, whereas Dunlop DAP1254 Light is 12–54. Intermediate gauges can differ too. Asking for the same light set from another brand therefore requires checking the actual numbers. Read the packet alongside the manufacturer's table, particularly when an online title is abbreviated. One different number does not automatically imply a dramatic increase in difficulty, but it should not be ignored either. Compare the complete sequence, construction and your own guitar. For the most predictable replacement, choose an exact designation rather than a familiar word on a coloured label. Keeping a photograph of the previous packet beside you while ordering is a simple way to avoid confusing closely related variants or accidentally changing more than intended.

5. Gauge and tension are related, not interchangeable
With other conditions equal, a larger diameter generally increases tension, but a real string includes a core, winding and a particular mass per unit length. Gauge is therefore not a complete measurement of the effort felt under your fingers. Scale length, tuning, action and technique also influence the experience. A longer scale requires more tension for the same string and pitch, while changing tuning changes the conditions in which the set operates. Do not transfer an impression from someone else's guitar to yours without checking those details. If a manufacturer publishes tension figures, identify the scale length and notes used for the calculation. Giving a seller your model, tuning and playing style is more informative than asking for vaguely soft strings. It relates the recommendation to an actual system instead of just the first-string diameter or the name on a packet.
6. A lighter set for a beginner
A lighter set can make fretting and some techniques easier, but should not conceal an unsuitable setup. If the action is excessive, thinner strings will not make every chord comfortable. Check playing position, string height and fret condition before discussing a gauge change within the manufacturer's limits. Very light strings under a forceful attack may buzz or show less stable pitch at the beginning of a note. That does not make them poor strings; the setup and technique need to suit them. For an initial experiment, change by a modest step and retain a record of the previous specification. Compare open chords, barre chords and quiet picking. Assess comfort using the music you actually play, rather than one isolated press in a shop. If playing remains excessively tense, reviewing technique and setup is more useful than repeatedly reducing diameter in the hope that it will solve everything.
7. When a heavier set makes sense
A heavier set may suit a particular strong attack, lower tuning or preferred resistance, but is not a universal route to professional sound. Check the permitted gauges for your model and the guitar's condition before changing. An older instrument, repaired bridge or uncertain geometry deserves individual assessment. Afterwards, neck relief, action and intonation may need checking. Do not turn the truss rod blindly just because the strings are different; first identify what has actually changed. Compare results in your usual tuning with the same pick and broadly the same playing strength. If the new set makes you grip continuously, an advantage on paper may have little practical value. A good choice supports both technique and instrument construction. Additional resistance should answer a musical need, not a desire to select the largest number. If unsure, ask a technician to assess the guitar before committing to the change.
8. What 80/20 bronze means
In this string category, the familiar 80/20 designation refers to a copper-and-zinc alloy used for the winding. Bronze is established commercial terminology here, rather than a complete chemical description of every part of the string. Players often consider these sets when seeking a clear upper range and distinct attack. The result still depends on the guitar, string construction and amount of use. It would be misleading to promise that every 80/20 set is brighter than every phosphor-bronze set in every condition. Meaningful comparison requires similar gauges and consistent circumstances. PRS Classic Acoustic and Dunlop DAB1254 provide two specific examples in this guide, with different endpoint gauges and their own series characteristics. Listen beyond the first bright strum to a normal accompaniment over several phrases before making a judgement about the material. The sound that works throughout a song is more useful than a momentary impression.

9. Phosphor bronze and tonal balance
Phosphor bronze is another widely used acoustic winding family. Manufacturers commonly describe it in terms of warmth, fullness and balance, but those words do not measure your particular guitar. More useful questions are whether a chord stays clear, how the third string balances with the second, and whether the bass competes with your singing. For fingerstyle, try quiet individual notes; with a pick, play several even strokes at different strengths. Dunlop DAP1254 and Cleartone 7412 both use phosphor bronze, but their gauges and protective technologies differ. Any difference cannot therefore be attributed to the alloy name alone. The successful set provides the balance required by your playing rather than winning through a general description. If one option seems overly dense, examine hand position and attack before ruling out the entire material family. A controlled comparison is more informative than a permanent conclusion from one brief trial.
10. Coatings and surface treatment
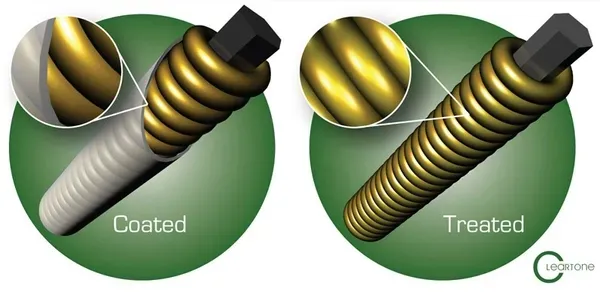
Protective technologies aim to slow the effects of contamination and corrosion, but different ranges implement them differently. Coated does not imply identical thickness, feel or application across brands. Cleartone explains its own surface treatment separately; the diagram included here illustrates that brand's stated principle, rather than an independent microscopic photograph. A marketing lifespan multiplier should not be treated as a guarantee for every player. Playing frequency, perspiration, humidity and care substantially affect useful life. Judge whether you enjoy the surface and how long the sound remains suitable for your purposes. Protected strings still need inspection for damage and dirt. Treatment does not make a string immune to mechanical wear or replace correct fitting. The economic value of a set is better assessed over your own replacement cycle than from the largest number printed on a packet. Compare actual usable sessions, not an assumed universal lifetime.
11. PRS Classic Acoustic 12–53
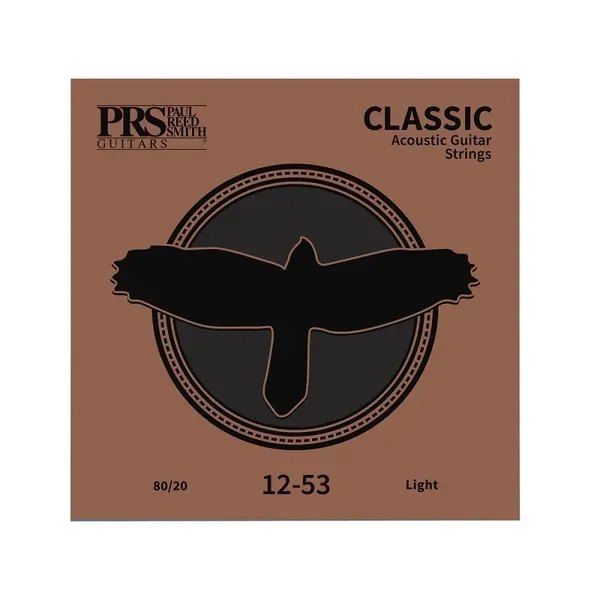
The PRS Classic Acoustic Light discussed here uses 80/20 winding and gauges .012, .016, .024, .032, .042 and .053. The official current-series description also specifies a protective coating, a hexagonal steel core and corrosion-resistant packaging. Its SoundsGood store SKU is 40133. This is a useful example of Classic being a series name rather than an instruction to fit the strings to a nylon-string classical guitar. Check the intended instrument type before installation. If you normally use 12–54, compare the entire sequence rather than just the final number. Confirm current packaging and contents when ordering, since a photograph may show a particular supply batch. Any recommendation must be based on guitar compatibility and the playing response you want. Matching the brand of the guitar and strings is not inherently necessary when the relevant construction requirements and specifications are satisfied.
12. Dunlop DAP1254 and DAB1254
These two designations are useful to compare because they represent different materials with the same gauges: .012, .016, .024, .032, .042 and .054. DAP1254 is phosphor bronze and DAB1254 is 80/20. Their SoundsGood SKUs are 20543 and 20536 respectively. This pair supports a clearer personal comparison, although construction and manufacturing details still deserve consideration. Do not identify the alloy solely by label colour: read the full model code and name. The photographs show front packaging, reverse identification and an inner packet with string information. Those details help during fitting and repeat purchases. If a set works well, save its exact code so that you do not accidentally order a neighbouring range with similar artwork and a different alloy. When buying several packets, also check whether the listing describes one complete set or a multi-set package. Similar-looking offers can contain different quantities.

13. Cleartone 7412 and its middle gauges
Cleartone 7412 is a treated phosphor-bronze 12–53 set listed by SoundsGood as SKU 32216. The product card specifies .012, .016, .025w, .033, .043 and .053. Compare that with PRS: the endpoints match, but the middle strings differ. An identical 12–53 label therefore does not guarantee identical feel. When replacing a third or fourth string individually, check the diameter in your own set rather than another packet also called Light. Assess the strings as a coordinated set, especially when moving frequently between melody and bass. Surface protection is a construction feature; actual service life must be judged in your own routine. Do not infer a particular loudness increase solely from an advertisement on older packaging. Compatibility, controlled attack and consistent performance after several normal sessions provide a better basis for selection than the first impression of a fresh packet.

| Set | Winding | Gauges, inches |
|---|---|---|
| PRS Classic Acoustic | 80/20 | .012 .016 .024 .032 .042 .053 |
| Dunlop DAB1254 | 80/20 | .012 .016 .024 .032 .042 .054 |
| Dunlop DAP1254 | Phosphor bronze | .012 .016 .024 .032 .042 .054 |
| Cleartone 7412 | Phosphor bronze | .012 .016 .025w .033 .043 .053 |
14. Comparing two sets fairly
Prepare three short passages: open chords, a picking pattern and a melody in several positions. Record the old set before replacement, noting its condition and approximate playing time. Once the new set is fitted and tuning is stable, repeat the passages with the same pick, microphone position and playing level. This is not a laboratory test, but it reduces random differences. Remember that old worn strings and fresh strings differ in age as well as series. Account for that when drawing conclusions about material. Make separate notes on comfort, sliding noise, balance and behaviour under stronger attacks. Better is less useful than specific observations that guide the next choice. If recording conditions change, write that down too. A different microphone distance can otherwise be mistaken for a substantial change in bass or loudness. Preserve the recordings so that memory does not become the only comparison tool.
15. Picks, fingers and sliding noise
Strings interact with technique, so one set can feel and sound different with fingers and a stiff pick. Try changing attack angle and strength before declaring the tone too harsh. If position changes create considerable sliding noise, examine fretting pressure and the moment at which fingers release. A different surface can alter the sensation but does not automatically remove every movement sound. Some of these details are natural in a recording and need not disappear completely. Play a short phrase slowly, separating a clean shift from unnecessary rubbing. Use the same pick when comparing sets, otherwise the cause of a difference remains unclear. Avoid changing strings, technique, equalisation and microphone placement simultaneously and then attributing the whole result to winding material. A sequential experiment identifies the change that actually helps your playing and avoids purchasing more equipment to address a problem caused elsewhere.
16. Standard and lower tunings
Standard six-string tuning from the sixth string to the first is E–A–D–G–B–E. Lowering the notes reduces tension in the same set and changes its response to attack. Regular use of an alternative tuning may call for a different set and a setup assessment. Do not choose solely from the advice of a player whose guitar has a different scale length or construction. Write down the exact notes and octaves rather than simply saying drop tuning. Individual strings may change by different amounts, so a balanced choice requires understanding the whole configuration. Raising pitch increases loading instead and should not be done casually. Begin with guitar and string manufacturer recommendations and involve a technician when uncertain. The musical goal needs to fit the instrument's mechanical limits. If you regularly move between several tunings, include that information when discussing a compromise set and setup.
17. Twelve-string guitars need a dedicated set
A twelve-string acoustic uses paired strings, and its set is not equivalent to two arbitrary six-string sets. In common standard arrangements, some pairs are in octaves and others in unison, so gauge and order must be checked separately. Dunlop DAP1047J, store SKU 27769, appears here as a dedicated 10–47 twelve-string set, not a lighter substitute for an ordinary six-string guitar. The 12-STRING marking has practical significance. During fitting, do not rely only on apparent thickness: use the set's diagram and the instrument's documentation. Pay particular attention to the thin octave strings and intended tuning. For a first replacement on this type of guitar, working with a technician or teacher can be helpful. Keep a clear record of every position. Before tuning, trace each string to the correct machine and confirm that the neighbouring members of a pair have not been confused.

18. Electro-acoustics and pickups
A jack socket or built-in tuner does not mean a guitar needs electric-guitar strings. First identify its basic construction: steel-string acoustics and nylon-string electro-acoustics belong to different families. Then consider pickup type. A piezo system responds to mechanical vibration through the bridge assembly, whereas a magnetic pickup has its own requirements for interaction with strings. Avoid a universal conclusion without consulting the specific system's instructions. After replacement, listen to each string through your normal equipment at a moderate level. If one becomes noticeably quieter, check fitting and component seating before compensating immediately with equalisation. Consult a technician if necessary. Acoustic balance, electrical output and playing comfort are connected but distinct criteria. Assess them in sequence to avoid confusing a pickup-contact issue with a new alloy's character or a change in your own attack. Establish the basic signal before adding effects or other processing.
19. Knowing when to replace strings
There is no single calendar interval suitable for every player. Consider sound, surface feel, visible corrosion and winding condition together. A familiar chord losing its required clarity, unpleasant roughness or visible damage can indicate the need for replacement or inspection. Darkening alone does not describe the entire condition. Before an important recording or performance, do not leave your first independent restring until the last few minutes; fitting and tuning stability need checking. Keep a simple log of installation dates and approximate playing intensity. After several cycles, you will understand your routine better than from a generic instruction to replace strings every fixed number of weeks. Protective treatment does not remove the need for observation. If a string has local damage, do not continue using it merely because a calendar deadline has not arrived. Condition and the demands of the next session matter more than a rigid date.
20. Preparing for replacement
Have the correct set, a tuner, a clean soft working surface, suitable cutters and, where needed, an appropriate bridge-pin puller ready. Support the guitar securely and provide enough light to see what you are doing. Remove objects that could scratch the top. Photograph the arrangement of strings, pins and windings before beginning, especially if the construction is unfamiliar. Do not use a random metal object as a lever against a finished surface. Prepare a safe place for small parts. If the saddle can come out, remember its orientation and do not reverse it arbitrarily. Choose cleaning products according to fingerboard material and finish. A clean cloth may be sufficient for ordinary dust; aggressive treatment without a need merely introduces additional risk. Open the fitting instructions for your string set beforehand, rather than discovering an important requirement after cutting a new string too short.
21. Removing old strings and bridge pins
Gradually release tension using the tuning machines first. Do not cut strings under tension or force out a bridge pin while the string is loading it. With a conventional pinned bridge, use an appropriate removal method without levering against vulnerable top surfaces. If a pin does not move, stop and establish why instead of simply increasing force. Pinless constructions require a different sequence, so general advice does not replace model-specific instructions. Coil removed strings in a controlled way so that sharp ends do not interfere with the work. While access is available, inspect the bridge and fingerboard surface. A visible crack, moving attachment or unexplained damage needs assessment before a new set is tensioned. Routine replacement is an opportunity to catch a problem early. Keep removed parts in a clear order when their fit differs and avoid casually swapping them between positions during reassembly.
22. Securing the new string correctly
In a typical pinned bridge, the ball end must seat correctly inside the assembly rather than remain positioned to push the pin upwards. Fit the string and pin according to the manufacturer's method, checking seating with a gentle pull. Do not hammer components or use glue to solve a problem caused by incorrect installation. If a pin rises as tension increases, release the string and inspect the seating. Do not hold it down forcibly while continuing to tighten. Other bridge types have their own attachment rules. Take time here, since a fitting error may become apparent during tuning. If construction or access is unclear, ask a technician to demonstrate on your guitar instead of copying the arrangement of a merely similar instrument. Once secured, check that the string crosses the intended saddle position and is not caught against an adjacent attachment point before continuing.
23. Tuning-post windings and trimming
Lead the string to its correct tuning post and allow enough length for secure attachment according to the hardware manufacturer's guidance. Conventional and locking machines can require different methods, so one universal wrap count is unsuitable. With standard machines, avoid disorderly overlapping turns and accidental changes in winding direction. The winding should provide predictable support without unnecessary layers. Some string constructions have specific requirements for bending and cutting, particularly with different core designs. Read the packet before shortening the end. Do not cut blindly based on advice intended for another series. After securing it correctly, remove long sharp ends with suitable cutters while controlling the offcut. Ends should not touch neighbouring strings, scratch hands or create unwanted rattles near the headstock. Check every position before bringing the complete set to pitch, rather than assuming that the success of the first string guarantees all the others were fitted correctly.

24. Tuning after installation
Increase tension gradually, checking the target pitch with a tuner and watching the attachment points. Do not rely only on a letter without its octave if a string feels unnaturally tight. After the first pass, recheck all six strings, play several chords and listen again. A little early retuning can be normal, but repeated large drops call for checking attachment, windings and tuning machines. Excessive stretching is not a sensible shortcut. Play quietly and moderately while listening for new unwanted sounds. If gauge changed, assess comfort in different positions. Form your impression after tuning settles rather than during the first seconds of checking the installation. Confirm that each adjustment returns to the intended tuning instead of gradually raising it at every pass. Calm repeated checks are more informative than rapidly turning several machines without listening to the individual strings or identifying which one actually moved.
25. Troubleshooting new buzzing
A new buzz does not automatically mean defective strings. First establish whether it happens on an open string, one particular fret or under every forceful attack. Check nut-slot seating, loose ends near the tuners and the position of relevant components. A substantial gauge change can alter the setup balance. Do not adjust the truss rod or file the saddle blindly in response to one sound. Make a short recording for a technician and identify both the previous and new sets. If the issue existed earlier, fresh strings may simply have made it easier to hear. Comparing your attack with an experienced player's on the same guitar can also help. Diagnosis should distinguish technique, fitting and geometry instead of attributing every difference to packet quality. This sequence targets the actual cause and reduces the chance of buying another almost identical set that leaves the original problem unresolved.
26. Everyday care and spare sets
Clean hands and a dry soft cloth after playing help remove moisture and dirt. Use specialised products only after checking compatibility with the strings, fingerboard and finish. Do not apply random household chemicals or scrape protective treatment from a string. Keep spare sets in their original sealed packaging in a dry place without excessive heat or crushing. For travel or performance, carry an exact spare set and a gauge list, especially with a nonstandard tuning. After one string breaks, assess the remainder: a fresh single replacement can sound different from an old set. Before a planned recording, preparing a coordinated set in advance is often more convenient than resolving balance during the session. Record installation dates in your notes, but avoid opening sealed spares merely to inspect their appearance long before use. Good storage preserves the practical value of a backup until it is actually required.
27. A final selection sequence
Begin with the guitar model, permitted string family and working tuning. Record all gauges in the old set and the specific change you want. Compare winding material, protective technology, string count and attachment. For a manageable experiment, change one principal variable at a time so that the result remains understandable. PRS 12–53, Dunlop DAP1254, DAB1254 and Cleartone 7412 are concrete examples here, not a universal ranking. The twelve-string DAP1047J serves a separate purpose. Before ordering, verify the exact code, contents and current availability. After fitting, evaluate comfort, tuning and balance in familiar music. The right set is compatible with the guitar, supports your technique and gives repeatable results without a struggle. Save the combination that works so that the next purchase becomes either a deliberate repeat or a clearly defined experiment, rather than a completely new search without a reference point.
Featured products
- PRS Classic Acoustic 12–53 — 40133
- Dunlop DAP1254 — 20543
- Dunlop DAB1254 — 20536
- Cleartone 7412 — 32216
- Dunlop DAP1047J, 12-string — 27769