




|
Quantity
|
Cost
|
||
|
|
|||
|
|
|||
Solderless cable kits for pedalboards and instrument connections
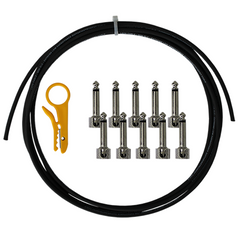
A solderless cable kit lets you build signal leads to the lengths you need without using a soldering iron. It is particularly useful on a pedalboard where standard patch cables leave unwanted loops or fail to reach the next effect. You plan the route, cut compatible cable and fit the connectors using the manufacturer's assembly method. The result can suit an individual layout closely, but careful construction and testing of every connection remain essential.
SoundsGood lists D'Addario PW-GPKIT-10 and PW-GPKIT-50 kits alongside LAVA CABLE LCPBKTR, LCTRKT-B Tightrope and LCMUPBKTR Tightrope Ultramafic models. Compare the exact item for plug quantity, cable length and connector design. Terms such as DIY and solder-free describe the assembly approach; they do not establish identical contents or compatibility between the components of different systems. Select a kit for your actual connection plan.
Plan pedal placement and signal routes first
Arrange the pedals in their intended positions and establish the signal order. Physical neighbours are not always consecutive in the audio chain: a cable may cross between rows, connect to a loop switcher or return from an external device. Mark each effect's input and output, its power connection and the areas that need access for footswitches. This creates a usable wiring plan instead of relying on the number of pedals alone.
Measure the route with the connector housings included. The gap between pedal edges is not the required cable length. Leave a modest allowance for unplugging a device or moving it slightly during service. A short link pulls on sockets, while excessive spare cable consumes space and obstructs access. A useful custom length should make the board easy to maintain, rather than simply appearing neat in a photograph.
Count plugs and finished leads separately
A conventional two-ended patch cable needs two plugs. For example, ten suitable plugs can make up to five such leads if sufficient cable is available. That is a planning example, not a claim about every kit's contents. Count pedal-to-pedal links, switcher connections, the board input and any other leads you intend to build with the selected system. Do not automatically include cables that require a different connector or wiring arrangement.
The total cut lengths must fit within the supplied cable allowance, including a trial assembly and possible re-cutting of an unsuccessful end. Planning down to the final centimetre is unhelpful when learning a new system. Extra cable does not compensate for too few plugs, however. Check both limits independently and find out whether matching spare connectors and bulk cable are available for future changes to the board.
Why matching cable and connector parts matters
A solderless connection relies on the plug's mechanical contact system and the cable's geometry. Diameter, centre-conductor construction, shielding and insulation thickness may all matter. Another brand's cable can fit inside a housing without forming the intended electrical connection. Use combinations explicitly supported by the manufacturer rather than selecting parts by approximate thickness or jacket colour. Mechanical fit alone does not establish compatibility.
Different ranges from the same brand should not automatically be mixed either. Before adding spare parts, compare the exact cable and plug models with the instructions. An unidentified old offcut is not proven suitable merely because an assembled lead produces sound briefly. Keep the packaging or record the cable reference. That makes a future purchase a specification check instead of an attempt to identify a series from an installed cable's appearance.
Straight, angled and compact plug housings
Right-angle plugs often help with close pedal spacing, but their bodies must fit beside neighbouring sockets. Some pedals have top-mounted connections, others have side-mounted sockets, and power or second-channel connectors may occupy the same area. Check the cable exit direction and whether the plug can be inserted fully. A small housing is useful only when its geometry also permits proper connection and access for maintenance.
A straight plug can be more appropriate at a panel or a particular recessed socket. Do not force an angled housing into an unsuitable position by bending the cable sharply. After arranging the board, confirm that the footswitches can be operated without striking the connections. Plug bodies should not support the weight of a pedal or rigidly tie two movable devices together. A little cable allowance prevents movement from being transferred directly to the sockets.
Follow the instructions for the selected assembly system
D'Addario's official instructions describe making a clean cable cut, seating the cable fully in the plug body and securing the provided screw. Do not transfer that sequence automatically to every LAVA CABLE kit or another brand's system: contact design and end preparation can differ. Start with one short trial cable to check the tools and understand the process before cutting and assembling the entire board.
Work on a clean surface with good lighting. Avoid loose conductors or shielding strands at the cut, and do not invent extra preparation steps. If the instructions do not require stripping insulation, do not add it as an assumed improvement. Tightening and reuse of components should follow the system documentation. Applying more force is not a substitute for correctly seating the cable and can damage parts instead of improving reliability.
Test every lead before fitting it to the board
Check the disconnected assembly with an appropriate cable tester or meter. For a normal TS patch lead, the tip must connect to its intended contact at the other end and the sleeve to its corresponding contact, without an unwanted short between them. Gentle movement near the housings can help reveal intermittent contact, but should not become a pull test that damages the assembly. A tidy exterior does not prove correct centre-conductor engagement.
After the electrical check, add the cable to the signal chain and test at a moderate listening level. Build the board progressively rather than installing every untested lead at once. If a problem appears after one new connection, it is easier to locate. Number the completed lengths or record them on the wiring plan so you can identify each tested route when the board is later dismantled or rearranged.
Audio kits and pedal power kits are different
An instrument or patch cable kit is intended for audio within its stated application. Cutting your own lengths does not turn it into a pedal DC power, MIDI, USB or speaker-power cable system. Power kits use their own connectors, polarity arrangements and specifications. Do not interchange parts because the jackets look similar or both products have DIY in their names. Identify the function before choosing the kit.
A conventional TS kit also does not automatically provide a TRS connection for expression control, stereo audio or a balanced signal. One pedal can have several similar-looking sockets with different purposes. Consult its instructions. For a controller, switcher or stereo effect, establish the required contact arrangement first, then confirm that the kit supports it. A matching plug diameter alone is not enough to make the desired connection.
Use, transport and fault finding
Secure cables where the case lid, pedalboard feet and pedal edges will not pinch them. Provide reasonable support near the plugs and unplug by the housing rather than pulling the cable. Recheck strained sections after moving effects. Solderless construction does not eliminate mechanical wear. Leads that are frequently disconnected still need inspection of the jacket, housing and retention, just as factory-finished cables do.
If sound disappears, check a known working instrument, the main lead, pedal power and individual patch connections in sequence. Avoid rebuilding the whole board at random. Remove a suspect assembly and test it separately; remake its end only using the supported method. A few tested ready-to-use spare patches are useful at a performance, where a quick replacement is often more practical than constructing a new connection under poor lighting and time pressure.
When a kit is preferable to ready-made patch leads
A solderless system is useful for unusual distances, a tightly arranged board or a rig that is periodically rebuilt. Ready-made patch leads are convenient when standard lengths already fit and you want completed connections immediately. Compare the number of required leads, assembly time, spare-part availability and your ability to test the results. Custom assembly should solve a practical layout problem rather than become an unnecessary step for every musician.
Before ordering from SoundsGood, prepare the board plan, connection count, approximate lengths and required plug shapes. Compare these against the contents of the exact item. Allow a sensible reserve of parts and space if expansion is planned. Reliable operation depends on sound connections, correct power and a well-organised signal path. The kit helps tailor the wiring, but it does not repair a faulty pedal or correct an incompatible power supply.
Frequently asked questions
Is a soldering iron really unnecessary? Yes, for the stated solderless system, but the tools and procedure specified by its manufacturer still apply. Check what is included with the particular kit.
Can I use any instrument cable? No. The cable must be compatible with the connector's contact mechanism, not merely small enough to enter the housing.
Should I assemble the whole board immediately? Start with one tested lead, then add the remaining connections progressively. This makes errors easier to identify and correct.
An example of a manufacturer's assembly procedure is provided in the D'Addario DIY Instrument Cable Kit instructions. Use the documentation belonging to your selected system and retain its requirements for compatible components and preparation.