




|
Quantity
|
Cost
|
||
|
|
|||
|
|
|||
Bulk instrument cable for custom connections
Bulk cable suits a specific length, particular plug arrangement or several matching pedalboard and studio connections. Unlike a finished lead, it needs connectors and assembly. Decide whether you will build it yourself or ask a technician. That choice affects the compatible construction, tools and accessories required.
Instrument signal cable is intended for appropriate low-level connections, such as a guitar feeding a pedal or amplifier input. It is not automatically suitable for a power amplifier output feeding a passive speaker. Identical jack connectors do not make instrument and speaker cable interchangeable. Check the purpose of the complete connection rather than plug appearance alone.
List each required length and the devices at both ends. Guitars, basses, pedalboards and line-level equipment can have different requirements. A single-conductor shielded construction does not create a balanced connection by itself. Conductor count and wiring must match the actual equipment interfaces.
Sales units and length planning
The category can contain cable priced per metre and packaged coils of a fixed length. Check the unit for the particular item and whether the required continuous length is available. Basket quantity does not necessarily mean the same thing for every product. A project needs suitable unbroken lengths rather than short remnants requiring additional joints.
Measure routes with plug housings, cable exit direction and equipment access included. Pedals need room for connections without excessive loops obstructing the board. A stage lead needs enough freedom for normal movement and its route to the equipment. Do not stretch cable tightly between two sockets with no working allowance.
Add a reasonable allowance for end preparation and a trial assembly. Prepare a cutting list for short patches before starting. Label intended uses so a long continuous section is not consumed by small pieces when another route requires it. Planning is particularly useful when working from one fixed-length coil.
Capacitance and the signal source
Cable capacitance is one parameter that can affect a passive instrument source. Compare values per unit length using consistent units. Total capacitance also depends on the finished length. Evaluate the specification with the instrument, its controls and the following input load rather than as an isolated quality score.
A low-impedance active output and a passive pickup can respond differently. Results from one signal chain should not be generalized to every other setup. On a pedalboard, consider buffer position and the cable path before it. Cable does not provide active amplification, and promotional descriptions do not replace comparison in the actual arrangement.
A practical choice combines necessary length, electrical characteristics and handling. Avoid making a connection substantially longer simply because spare cable is available. Where a long route is necessary, assess an appropriate transmission arrangement with the equipment involved. The issue may concern system design rather than a more expensive outer jacket.
Shielding, flexibility and mechanical use
Shielding helps limit interference in a correctly constructed connection. Check its design and preparation requirements. Layer count and a thick outer diameter do not independently demonstrate the best result. Stage use also needs flexibility, repeated bending suitability and manageable coiling, while a fixed installation may prioritize other characteristics.
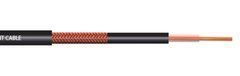
Some instrument cables include a conductive layer beside the insulation. Prepare it as instructed so it cannot contact the signal conductor where that would be inappropriate. Do not assume every black layer is ordinary insulation. If the construction is unfamiliar, check the manufacturer's guidance before soldering a trial sample.
A compact flexible design can suit short patches, while moving stage leads may need different mechanical properties. Check permitted bends and connector compatibility. Do not crush a cable under a case lid or arrange it so opening the pedalboard repeatedly loads the internal plug contacts.
Connector choice and strain relief
The connector must suit the wiring, cable diameter and required exit direction. Straight and angled housings occupy different space beside neighboring sockets. Confirm that an angled plug does not block another connection or control. A crowded pedalboard needs the complete housing dimensions, not only the contact section length.
The cable clamp must grip the jacket within its specified diameter range. Thin cable may be held poorly, while oversized cable may not fit without damage. Do not cut arbitrary parts from the mechanism to force an incompatible pairing. Choose a suitable connector or a manufacturer-approved component for the required size.
Strain relief protects internal connections during normal movement and should not depend on the conductor or solder joint alone. Put housing components onto the cable in the correct order before completing the ends. After closing the connector, confirm that the cable is neither freely rotating nor pinched by an unintended part.
Soldered and solderless assembly
For soldered connectors, use the selected model's contact diagram. Prepare stripping lengths without damaging fine strands or insulation. Shield strands must not touch the signal contact. Appropriate tools and skills are required; otherwise, provide a technician with the cable, compatible plugs and cutting list rather than experimenting with the whole kit.
Solderless technology is a compatible cable-and-connector system. It does not mean any bulk cable can be pushed into any solderless plug. Check diameter, center conductor construction and the kit instructions. A clean cut and full insertion may be important to the intended contact mechanism.
Do not transfer a soldered connector's stripping procedure to a solderless design that specifies another method. Build and test one sample before cutting and assembling the remaining lengths. This allows a tool or sequence problem to be corrected before the entire coil has been consumed.
Testing every finished lead
Check continuity and the absence of unintended shorts with a suitable tester while the cable is disconnected. Then perform a listening test in the intended signal chain at a moderate level. No visible defect does not prove that a contact inside the closed housing is reliable, particularly after custom assembly.
Gently test normal movement near both connectors. Crackling or signal loss needs investigation rather than concealment through level changes. Test short patches individually before installation. Finding one faulty jumper inside a fully wired pedalboard usually takes longer than testing it before routing and securing everything.
Label length and intended use. Keep cable and connector identifiers for repair or a matching second kit. After rearranging pedals, check for new tension or sharp bends. Electrical continuity does not eliminate mechanical placement requirements, and installed wiring should remain accessible for service.
Catalogue formats and ordering information
The page includes RAPCO HORIZON, LAVA and D'Addario instrument cable in different sales formats. Confirm the exact model's specifications, unit length and continuous-cut availability. Do not transfer solderless-kit compatibility or electrical values between products merely because they share a brand.
Provide the equipment list, lengths, connector types and assembly method. If plugs have already been purchased, include their exact identifiers. Describe use on a stage floor, beneath a pedalboard lid or in a fixed rack. This helps assess flexibility, dimensions and routing alongside electrical requirements.
Storage and reuse
Coil finished leads without forced twists or tight knots. Keep heavy objects away from the plug exit points. Store unfinished lengths so prepared ends remain clean and undamaged. If a coil is used gradually, mark the remaining length after each project so the next cutting plan is based on what is actually available.
Before reusing an old length, inspect its jacket and previously prepared ends. New plugs do not automatically correct damage in the middle. Keep a tested spare lead for important performances. This allows a quick replacement while leaving time to diagnose the original fault afterward.
Common questions about bulk instrument cable
Are connectors included in the metre price? Do not assume so. Bulk cable and complete kits are different products; check package contents.
Can it feed a passive speaker? Use cable intended for the relevant power output. An instrument signal lead is not automatically suitable.
Are connectors compatible if their diameter matches? Conductor construction, clamping range and wiring must also be suitable. Solderless systems require particular care when matching components.