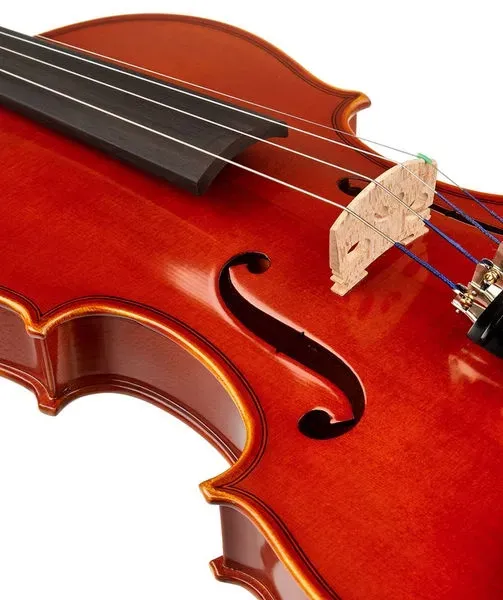
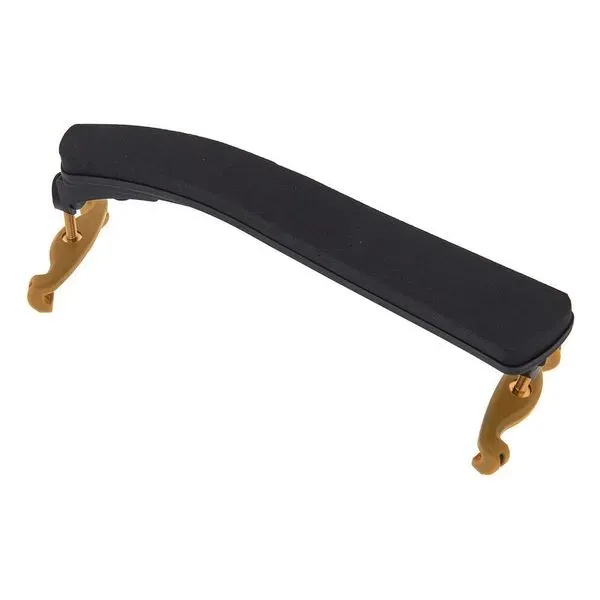
A first violin should make it possible to practise, hear progress and develop reliable movements. Choosing a familiar logo or the most expensive outfit within your budget is not enough. The instrument needs to fit the player, work properly and arrive with the items required for a lesson. Attractive varnish and an impressive sound cannot compensate for a child stretching too far, struggling to stop a string or constantly fighting slipping pegs. This guide separates size, construction, setup and accessories so that you can have a useful conversation with a teacher before ordering. Photographs of the Yamaha V5SA 4/4 illustrate the instrument, while the Kun Original 300 illustrates shoulder support. They are examples of construction, rather than a claim that one outfit is suitable for every beginner.

Start with the learning situation
Before browsing models, establish who will play, where lessons will happen and who will help with the first setup. For a child entering music school, the future teacher is the most useful starting point. An adult beginner should prioritise a practical fitting session and a realistic place for regular practice. If lessons are online, arrange an in-person instrument check or identify a local violin technician. A camera can support instruction, but it cannot reliably reveal every aspect of fit and mechanical condition.
Describe the situation in ordinary terms: the student travels to lessons twice a week, carries the outfit personally and has a music stand at home. This immediately explains why case weight, straps and access to service matter. It also prevents unnecessary shopping. A beginner initially needs a functional learning outfit, rather than an entire collection of professional accessories. Clear requirements help a shop explain what is included and what should be selected separately.
Understanding fractional sizes
Labels such as 1/4, 1/2, 3/4 and 4/4 identify violin size categories. They do not describe a fraction of the quality, volume or musical potential. A half-size violin is not literally half as large in every measurement, and moving from 3/4 to 4/4 does not automatically indicate professional ability. Fractional instruments provide a way to match the instrument to the student's physical proportions. Yamaha offers the V5SA in several sizes, so the model name alone is insufficient when placing an order.
The photographs here show the V5SA 4/4 specifically. They explain the construction but cannot replace trying a smaller instrument. Screen appearance is unreliable for judging size because scale, camera angle and cropping change the impression. Confirm the complete size designation in the basket, invoice and correspondence. This is particularly important when several sizes share a product page or when search results shorten the title. A correctly identified model in the wrong size is still the wrong purchase for that student.

Why age charts are only a starting point
Two children of the same age can have different arm lengths, shoulder proportions and coordination experience. An age chart can narrow the initial search, but it cannot make the final decision. Yamaha's guidance on children's instruments also emphasises individual checking. Height is a useful reference, yet it does not describe every relevant proportion. A student near the boundary between two sizes especially benefits from trying both under supervision.
Ask the teacher to assess more than the ability to reach the scroll. The working position, finger placement and bow movement all matter. A simple extended-arm test may provide an initial indication, but it should not become the only formula. If there is uncertainty, compare neighbouring sizes rather than choosing the larger one because growth seems likely. A fitting session should establish what supports comfortable learning now. It cannot accurately predict every future change in the child's body or technique.
Buying room to grow can create an obstacle
An oversized violin asks the student to adapt to extra reach and an awkward arm position. During early lessons, that struggle may look like insufficient effort even when the instrument's geometry contributes to it. Determination does not automatically overcome an unsuitable size. The initial aim is to build repeatable, manageable movements, rather than to compensate daily for a problem that could have been avoided at purchase.
A smaller violin should not remain in use indefinitely simply because the child is familiar with it. Reassess the need to move up with the teacher. Ask for a specific explanation of what has become restrictive and how the next size changes the working position. Scheduled checks are more useful than a change based solely on a birthday. Families may also investigate rental or eventual resale, but should not assume a guaranteed resale value. Condition, completeness and actual demand will affect that decision later.
Does every adult need a full-size violin?
A 4/4 violin is the usual starting point for an adult, but age alone does not replace a fitting assessment. Arm proportions, mobility and habits vary. Discomfort may come from shoulder-rest height, chinrest shape or left-hand position rather than from the body size. Avoid changing size before the cause is understood. First ask a teacher to assess the whole support arrangement and a few simple playing movements.
Wear ordinary light clothing that allows movement during the fitting. A winter coat or rigid high collar changes the contact and can obscure the result. Hold the violin, try suitable movements and compare a few support settings. Stop and investigate if discomfort persists. A more expensive instrument in the same size is not an automatic solution, even if its tone is attractive. Physical suitability needs its own assessment, separate from the impression made by an experienced player demonstrating the sound.
What a complete outfit actually includes
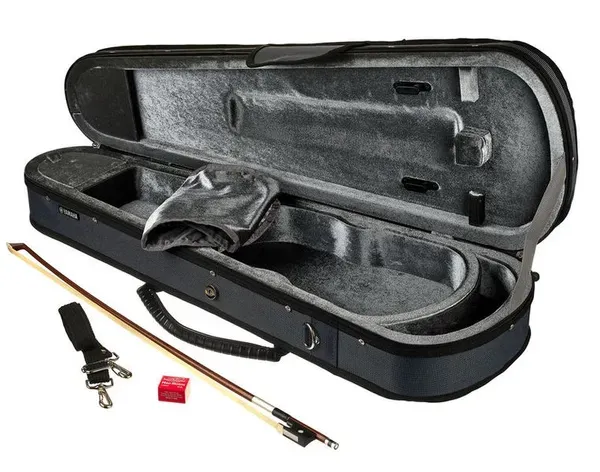
An outfit reduces the number of separate purchases, but the term does not guarantee every item a particular student needs. Check the list: violin, bow, case, rosin and the instrument's preparation for playing. Yamaha describes the V5SA as an outfit with a bow, case and rosin. A shoulder rest, music stand, tuner or other accessory should not be assumed to be included because it appears in photographs of another set.
Separately ask whether the bridge position, peg operation and general setup are checked before dispatch. A well-made factory instrument still deserves careful inspection after transport. Written confirmation of the contents is useful before payment. It prevents the first lesson from revealing that an accessory was merely illustrative or intended for a different size. This is particularly relevant when buying a gift: the recipient needs a usable outfit, rather than an attractive unopened package with uncertain contents.
The Yamaha V5SA as a construction example
Yamaha specifies a spruce top, maple back and neck, and ebony components for the V5SA. These materials help describe the construction but do not by themselves establish how a particular instrument feels. The practical questions remain whether the mechanics work, the setup suits learning and the outfit is convenient to use every day. A wood specification cannot replace playing and inspecting the instrument.
Do not combine the specifications of the V5SA and V5SC. Their names are similar, but particular construction details and outfit arrangements differ. Yamaha describes the V5SC tailpiece separately; its specification should not be transferred automatically to every V5SA. The photographs in this guide show the listed V5SA 4/4 with four fine tuners. Check the complete model designation and current specification of the selected version. If the description and photograph disagree, ask the shop to clarify the actual supplied instrument before ordering.
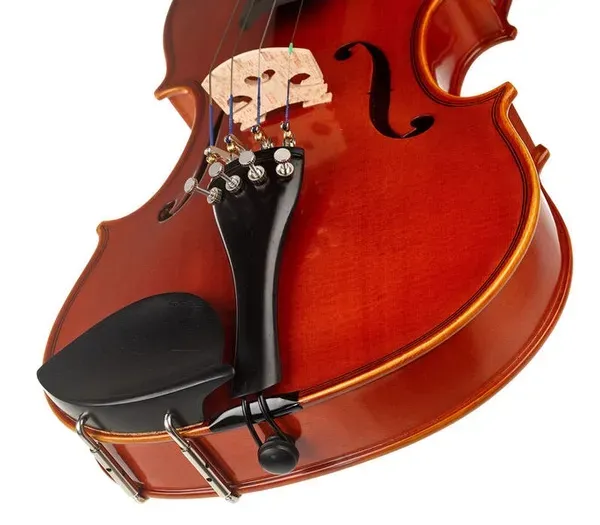
Inspect the body without attempting repairs
Under good light, look at the top, back, ribs, edges and neck joint. Ask for an explanation of visible marks, irregularities or areas that resemble cracks. A photograph may not clearly distinguish wood figure, a varnish scratch and a structural problem. When uncertain, seek a technician's inspection rather than relying on an optimistic interpretation. This matters especially with a used violin whose maintenance history is unknown.
Do not press on the top, rock the neck or test strength by applying force. Observation and normal trial playing are enough for an initial assessment. A used violin can have cosmetic wear and remain suitable for lessons, while a new-looking one can need adjustment. Evaluate the complete working instrument rather than the shine of the finish. Ask about specific defects and any work required, so that the total cost of obtaining a usable outfit is clear.
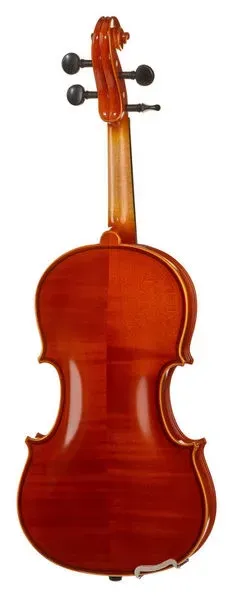
The bridge and shoulder rest are different parts
The wooden bridge stands on the top and supports the strings. A shoulder rest attaches underneath and helps organise the player's support. These components are sometimes confused in casual conversation, although their functions are different. When asking for help, identify the part clearly or provide a photograph. This is particularly useful when ordering accessories remotely or describing a setup problem to a shop.
A beginner should not casually move, cut or glue the bridge. Its position, shape and fit affect the instrument's operation. If it has shifted after transport or looks noticeably different, ask a teacher or technician to assess it. Do not reproduce an isolated video tip on a new violin without understanding the work. The photographs here show where the bridge sits, not a universal template for its height or angle. Similar appearance does not make every instrument's setup interchangeable.
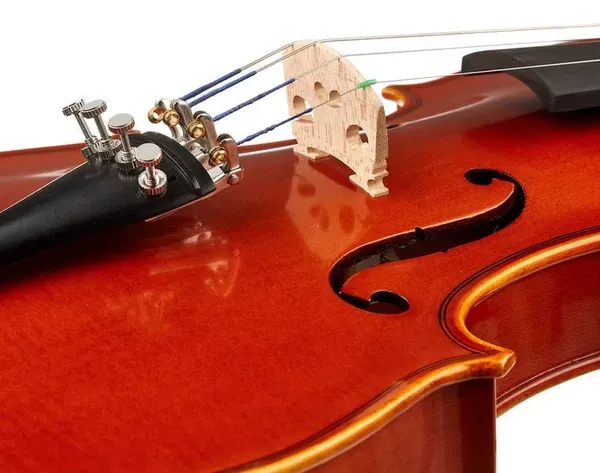
Pegs, fine tuners and the first tuning session
Pegs change string tension, while fine tuners provide smaller adjustments. Beginners need to distinguish these tasks and avoid trying to reach a note with one abrupt, large turn. Ask the teacher to demonstrate on the actual violin. If a peg slips, sticks or needs unusual force, investigate its condition rather than simply pushing harder. An unfamiliar mechanical response is a reason to stop and clarify the next step.
Four fine tuners can simplify early adjustments, but they do not keep the instrument in tune permanently. New strings and changing storage conditions affect stability. Check tuning regularly and note questions for the next lesson. A tuner indicates pitch; it does not establish whether every component is fitted correctly. Avoid winding a mechanism so far that it contacts the top. It is better to examine the available adjustment range with a teacher once than to discover its limits repeatedly through trial and error.
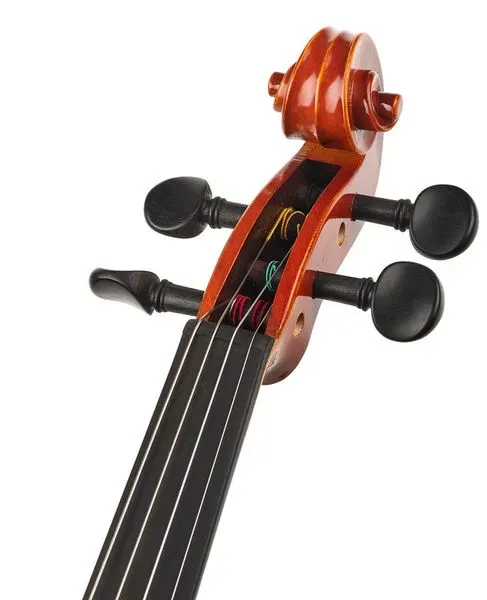
Fingerboard and string-stopping comfort
A beginner may find it difficult to separate an unfamiliar movement from unsuitable setup. Ask an experienced player or violin technician to assess string height and the fingerboard. Direct comparison with a guitar is misleading because scale length, stopping technique and left-hand organisation differ. Without frets, the student develops intonation rather than locating a ready-made metal boundary for each note.
Have someone check simple notes in different areas and listen for unwanted buzzing. If a movement seems unusually difficult, ask the teacher to repeat it on the same violin and explain the observation. Do not file the nut or sand the fingerboard following a forum suggestion. Small interventions can alter geometry and require substantial correction. For a first purchase, a clear working condition is more valuable than attempting to learn repair alongside the first notes. A properly assessed setup also makes teaching feedback easier to interpret.
What to inspect on the bow
The bow is a full part of the outfit. Look at the stick, frog, screw and hair, and ask someone to demonstrate working tension and loosening after use. More tension does not automatically mean better sound. If the mechanism moves unevenly or the hair has obvious problems, clarify the condition before purchase and find out whether servicing is needed.
Try the bow with the violin being considered. A teacher can assess control and help interpret what the student feels. There is no immediate need for an expensive separate bow if the supplied one is functional and appropriate for the lessons. Equally, do not ignore its condition while spending the whole budget on the violin body. A damaged or awkward bow can make an even sound difficult regardless of the instrument's price. The useful outcome is an outfit that works together and supports repeatable basic movements.
Rosin and preparing the first sound
Rosin helps the bow hair interact with the string. Sometimes a beginner interprets a weak initial sound as a faulty violin when a new bow has not yet been prepared. Ask the teacher to demonstrate application and check the result. Several expensive rosins are unnecessary at this stage. First learn the basic procedure and recognise how the contact changes. This is a practical skill rather than a comparison of accessory prices.
Excess rosin is not an advantage either. If a great deal of dust appears, surfaces become dirty quickly or control seems difficult, discuss the application at a lesson. Keep rosin in its packaging so it does not break or soil the case. Avoid unnecessary finger contact with the bow hair. Consistent preparation makes it easier to distinguish movement problems from accessory condition. A repeatable routine is more informative than continually switching brands before the student understands the original setup.
Chinrest and shoulder support work together
The chinrest sits on the upper side near the tailpiece, while shoulder support works underneath. Consider them together with head and shoulder position. A higher shoulder rest is not always preferable, and an expensive chinrest does not guarantee comfort. The fitting goal is a stable arrangement that allows the student to carry out lesson movements without constant additional squeezing. Static holding and actual movement should both be checked.
Do not copy another player's settings from a photograph. Identical violins do not imply identical physical requirements. A teacher may suggest a different angle, height, contact position or accessory. After making a change, try a little simple playing. If the support slips or needs continual readjustment, investigate before long practice sessions. Discomfort should not be accepted as an unavoidable part of learning or compensated for with force. A useful fitting allows attention to return to the musical task.
Selecting the shoulder-rest size
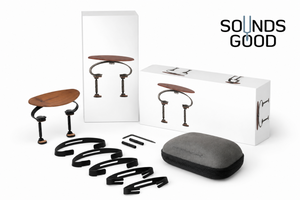
A shoulder rest must match the violin and the range specified by its manufacturer. Kun Original is offered in different versions; the 300 shown here is intended for a 4/4 violin. Adjustment does not make it suitable for a 1/4 instrument. It helps adapt an appropriate model to the player and body, rather than making every accessory universal across all sizes.
Check protective foot coverings, secure seating and safe storage in the case. Kun specifically warns against regularly removing the Original's feet just to make it more compact. Other models are designed to fold. This detail matters in daily use: if compact storage is necessary, choose a construction intended for it. Do not improvise modifications or trap the rest under the case lid beside the violin. Check the complete storage arrangement before purchase, when changing the selection is straightforward.
Evaluate the case with the full outfit inside
An empty case can feel convenient, but assess it with the violin, bow, rosin and necessary small items inside. The instrument should sit securely and the lid should close without extra pressure. Confirm that the bow holder works and accessories cannot move freely against the varnish. A shoulder rest should not be left in an arbitrary space unless it can be stored safely there.
For a child, check weight, handle and straps in the real lesson-travel scenario. The marketing word “lightweight” is not enough. An external pocket may be useful for music, but overloading changes balance. A case protects during ordinary transport; it does not make a violin immune to impact, heat or cold. Careful handling remains essential. Also decide where the packed instrument will live at home, away from heating and places where passing people may knock it over.

New, used or rented
A new violin offers clear provenance and a current outfit specification, but still requires checking. A used instrument can be a sensible option after assessing condition and service costs. Rental may suit growing children when a reliable service with clear terms is available. Compare the total expense and working condition, rather than only the advertised initial price. An inexpensive body without a usable bow or case may become an expensive complete outfit.
For a used violin, request repair history, recent photographs and an opportunity for a technician to inspect it. Unverified descriptions such as “antique”, “German” or “professional” do not establish suitability for learning. Old wood does not automatically outperform a new student instrument. If inspection is unavailable, acknowledge the uncertainty honestly. An appealing seller's story cannot replace assessment or reveal the cost of correcting hidden problems. The important comparison is what the student will actually receive in usable condition.
Organising a short playing comparison
Compare instruments in the same room under similar conditions. Ask the teacher to play the same simple passages, then let the student try suitable movements. Avoid assuming that the loudest instrument is the best. Control, consistent response and comfort matter. A long virtuoso demonstration can be impressive without explaining how a beginner will feel during the first month. Simple repeatable tasks often provide more useful information.
Write specific observations: the pegs turn smoothly, the case is heavy, the rest slips or one string produces an unwanted noise. These are more useful than a general statement of preference. A phone recording can help recall the demonstration, but automatic processing and microphone distance affect comparison. Decide using the student's experience and the assessment of someone who has examined the instrument personally. Do not dismiss an awkward fit merely because the sound in another player's hands is attractive.
Allocating the budget
Allow for missing outfit components, an initial check and lessons. A cheaper violin that requires a separate bow, case and adjustment may change the final total considerably. For a child, consider a future size change without trying to avoid it by buying an oversized body now. A realistic plan for reassessment is more useful than creating an immediate playing obstacle.
Delay optional upgrades until a specific need appears. Expensive strings, premium rosin and several shoulder rests do not replace working mechanics and regular practice. Ask the teacher which purchase would remove a current limitation. If there is no clear answer, retain money for servicing. This allows the outfit to improve as the student gains experience rather than according to advertising promises. Each upgrade should answer a practical question about the task it solves at that stage of learning.
Delivery inspection and the first lesson
After delivery, confirm the model, size and contents, then inspect the case and instrument. Record damaged packaging before taking further steps. After a substantial temperature change, allow the outfit to adapt to the room instead of immediately starting to play. If the bridge has moved, an unusual sound comes from inside or damage is visible, stop tuning attempts and seek assistance. Avoid attempting to conceal or correct the issue before it has been assessed.
Bring the complete outfit to the first lesson, including rosin and shoulder rest. Ask for a demonstration of opening the case, preparing the bow, checking tuning and packing away. Write down a short personal routine rather than reconstructing it from memory at home. Good preparation reduces incidental difficulties and leaves more attention for listening and movement. Clarify which actions the student can do independently and which still require an adult or teacher's help.
Daily care and the practice space
After playing, remove rosin dust with a suitable soft dry cloth and loosen the bow hair as demonstrated. Do not use household cleaners, alcohol or an arbitrary polish on the varnish. Keep the violin in its closed case away from heaters, direct sunlight and places where it may be knocked. Avoid leaving the outfit in a car for extended periods. Simple regular care is preferable to occasional aggressive cleaning with unsuitable products.
Set the music stand at a comfortable height and clear enough space for bow movement. Short attentive practice with a clear task is more useful than prolonged repetition in an awkward position. If a new noise, instability or discomfort appears, note the circumstances and show the teacher. Prompt clarification helps prevent a small setup issue becoming a habit of compensating with force. Avoid changing several components at once, since that makes it difficult to identify what affected the result.
A final check before ordering
Before payment, confirm that you can explain the chosen size, identify who checked the fit and list the outfit contents. Clarify the condition of pegs and bow, the first setup arrangement and shoulder-rest compatibility. Check case convenience and the items required for lessons. Resolve unanswered questions before ordering. A brief clarification is more useful than discovering a missing essential after delivery.
A successful first violin does not promise immediately beautiful playing. It provides predictable conditions in which the student can learn, notice change and trust the instrument. Suitable size, careful setup and a clear outfit specification often matter more than attractive descriptions of tone. Choose an option checked for the individual student and leave later decisions for work with the teacher. The purchase then becomes part of learning rather than an attempt to solve every future musical requirement in advance.
Why a video cannot replace fitting
A demonstration video can reveal a broad sound character and show the requested model. However, the result also depends on the room, microphone, processing, bow, strings and performer. Even the phone's position changes the impression. It is therefore unreliable to rank instruments precisely using recordings made under different conditions. You would be comparing the entire recording chain as well as the violins themselves.
Request a short demonstration of open strings and a simple unaccompanied passage. For a remote purchase, ask separately for current photographs of the actual instrument and details of its preparation. An attractive video does not show how smoothly the pegs move or how comfortably a child reaches the working position. Treat it as additional evidence and assess condition and fit practically. If an in-person fitting is impossible, agree with the teacher what information will reduce uncertainty and what must be checked on arrival.
Strings and identifying the cause of a poor sound
New strings may need time to stabilise, while worn or damaged ones may respond unevenly. Nevertheless, an unwanted sound does not always mean that a new set is immediately necessary. Bow contact, rosin, a loose component, setup or an inconsistent beginner movement may be involved. Ask the teacher to play the instrument and check likely causes in sequence. This is more informative than replacing several accessories simultaneously.
When replacement is appropriate, confirm size, compatibility and the particular string's end fitting. The label “violin strings” alone is insufficient for a fractional instrument. Do not remove every string at once without understanding the procedure, since changing tension affects parts held in place by working tension. Complete the first change with a teacher or technician. Keep the exact set identification afterwards so that a future order does not depend on remembering the packaging colour.
When a child dislikes the instrument
First establish what the child dislikes: the sound, the physical feeling, travelling to lessons, the exercise difficulty or the appearance. These are different situations, and a new violin will not resolve them all. If the complaint is discomfort, check size and support. If the sound is disappointing, ask the teacher to show one small movement correction and its result. A concrete achievable step is easier to understand than a general instruction to practise more.
Let the student participate among options already approved for size and condition. Opening the case independently, taking the bow comfortably and recognising the outfit can support a practice routine. However, do not give the child responsibility for technical assessment. Adults and the teacher check suitability; the student describes personal sensations. This division makes discussion calmer and keeps attention on real needs. Consider these observations together rather than allowing appearance alone to determine the purchase.
Questions to ask the shop
Request confirmation of the full model name, size, accessories and checks performed before handover. Ask about fitting with a teacher, reporting a problem after delivery and access to adjustment services. For a special-order item, clarify the actual outfit contents and expected supply timing. A photograph of a model range should not be treated as an exact view of the contents of one box. Keep the answers with the order for comparison on arrival.
Name components accurately: shoulder rest, bridge, chinrest and tailpiece are different items. Specific questions produce more useful answers. Also clarify whether a fitting appointment is required and who should attend. A prepared purchase leaves more time for music after the first opening of the case. The main result should be a suitable functioning violin and a clear route to the first lesson, rather than the longest possible list of accessories.