A detailed saxophone guide to instrument size, tip opening, chamber and baffle, reed matching and a fair playing comparison.
1. Build a shortlist before visiting the shop
Write down three things: what you like about your current setup, what gets in the way, and what should change after purchase. For example: “medium dynamics feel comfortable, but quiet entrances are unreliable; I want to start phrases without extra pressure.” That is more useful than simply asking for better tone. Choose two or three candidates with known specifications rather than ten random models. Bring your own instrument, reliable reeds, ligature and a short excerpt. Arrange the trial in advance. Ask for each product’s precise version, because similar markings may describe different designs. Afterwards, return to your original notes and check whether a candidate solves the problem you actually brought.
2. Start with saxophone size and musical purpose
First identify your instrument: soprano, alto, tenor or baritone. Each needs a compatible mouthpiece; similar letters in a product range do not imply the same fit. Then define a goal: easier quiet entrances, upper-register control, a different tonal palette or less fatigue during rehearsal. Listen in the context of your ensemble. A sound that is impressive alone may not serve your part well. If response deteriorates suddenly, check the reed, its position and instrument leaks before assuming that a replacement mouthpiece is needed.
3. Understanding tip opening
Tip opening is the gap between the mouthpiece tip and the fitted reed tip at rest. Compare measurements in millimeters or inches rather than model numbers alone; manufacturers do not share one numbering scale. For example, 152 in a Vandoren column marked “1/100 mm” means 1.52 mm, not 152 mm. A larger opening does not indicate a more professional player. What matters is retaining quiet attacks, the required dynamics and control without unnecessary effort. A large jump away from your familiar opening can make a useful comparison more difficult.


4. Start with the music you actually play
An orchestra, chamber ensemble, jazz quartet and amplified stage can demand different priorities. Write down where you need more flexibility: quiet attacks, clear fast passages, tonal control or comfortable long sessions. Do not reduce the choice to metal versus hard rubber. Material does not describe the entire geometry, and a jazz label does not guarantee your preferred result. For ensemble work, check whether you can vary tone colour and dynamics while remaining in control. If you normally use a microphone, include familiar stage equipment in a trial where possible. Avoid changing sound processing and mouthpiece at the same time, since that obscures the cause of any difference. The strongest candidate should help with your real repertoire, not merely produce one impressive sound in a shop.

5. Why the facing matters
The facing includes the reed-contact area and the curve that moves away from the reed toward the tip. Its length and shape work together with tip opening. Two mouthpieces with the same gap can feel different, so do not select by one number or treat a short or long facing as a quality ranking. A useful assessment is to play familiar phrases with different articulations and compare the effort involved. Check for visible damage. Sanding the surface yourself before testing changes the geometry and removes the basis for a fair comparison.
6. Chamber, internal shape and material
The chamber is the mouthpiece’s internal space, and its shape is part of the acoustic design. Saxophone specifications may also describe the baffle, the internal contour near the entrance. Do not infer the complete sound from appearance: shiny metal or black ebonite does not reveal the internal geometry. Descriptions such as bright, warm or focused suggest an intended character rather than a guaranteed result in your setup. Use them to form a shortlist, then listen to recordings. Material comparisons are useful when considered alongside construction, fit and playing comfort.
7. Match the reed to the mouthpiece
Your usual reed may not be the best match for a new mouthpiece. With other factors similar, a more open design often calls for a softer reed, but facing length and reed profile also matter. Start with the manufacturer’s suggested range for the particular reed series. For AL3, Vandoren lists Traditional 2½–3½ and JAVA 3–4: a number without the series name is insufficient. These are trial ranges, not instructions to choose the hardest reed. Bring several sound examples and neighboring strengths so that one unsuitable reed does not decide the mouthpiece’s future.


8. AL3, AL4 and A6: reading the differences
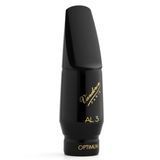
Three specific Vandoren alto models illustrate useful differences. AL3 OPTIMUM has an opening of 152 in hundredths of a millimetre and a medium-long facing. AL4 is listed as 163+ with a medium-short facing; preserve the plus sign rather than inventing a precise decimal value. A6 V16 is listed at 196 with a medium-long facing. For A6, also identify the chamber: SM812S+ and SM812M are different versions. This trio illustrates specifications, but it does not mean every beginner needs to try all three. For a modest change to a familiar setup, start with a candidate close to your current musical purpose. For a different direction, allow an appropriate reed and adjustment time. Maximum volume is only one consideration: quiet starts, short notes and endurance matter as well.
9. Saxophone: test your whole working range
After warming up, tune the instrument and check the low and upper registers as well as a middle note. Play a quiet entrance, a long tone with a crescendo, a short articulated phrase and an excerpt from your repertoire. Add subtone or altissimo at the end if these are established parts of your technique. Avoid judging only by volume: a louder sound in a small room can create a strong first impression. Listen instead for intonation and control at normal dynamics, without continually changing your embouchure to accommodate individual notes.

10. Avoiding misleading reed comparisons
Do not reject a model because the first reed feels too resistant, or buy it because one random reed happens to speak easily. Prepare several reliable reeds and an adjacent strength from a familiar series. Start with the same reed to hear the broad change, then find a working combination for each candidate separately. Record the exact series: matching numbers on different boxes need not feel the same. Test short articulation, connected intervals and quiet starts as well as sustained notes. If an easy reed impresses during the first minute, repeat more demanding material near the end. If a harder reed requires constant squeezing, do not treat that as a necessary stage of professional progress. Keep the complete setup name in your final notes: that combination is what you will use in lessons and rehearsals.
11. Neck fit and ligature
The mouthpiece should sit securely on the neck cork without requiring excessive force. Test it on your own instrument: tuning a middle note does not establish consistent intonation across the range. If the fit is too loose or tight, have a technician assess the cork and compatibility rather than sanding the new mouthpiece. A different outer diameter may require a different ligature. It should hold the reed without pulling it out of alignment. Include a suitable ligature, cap and spare reeds in the real purchase budget.
12. Soprano, alto, tenor and baritone need separate choices
A favourite alto opening designation is not a ready-made recipe for tenor. Identify the instrument first, then consult the scale used by that manufacturer and series. When moving to another saxophone type, do not automatically transfer the reed, ligature or expectations from your familiar setup. Use your own instrument and usual neck for the trial, or too many factors change simultaneously. Check cork fit without excessive force. Tune each candidate before comparing passages; matching the exact insertion distance is not an objective in itself. Assess reference notes across several registers rather than judging the entire setup from one tuner reading. If you double on several saxophones, include the practical transition between instruments. A setup that feels comfortable in isolation may require different adjustment during your normal concert routine.
13. Volume, projection and control
During a short trial, louder can easily be mistaken for better. Test that impression by playing both options at comparable dynamics, then ask a listener to judge phrase clarity from a distance. Go beyond brighter or darker: ask whether articulation is distinct and the melody retains its character in quiet passages. Try a gradual crescendo and diminuendo on a familiar note, then within an actual phrase. An impressive strong sound accompanied by awkward quiet starts is a mixed result worth recording. A reverberant room can create a different impression from a dry rehearsal space. If possible, test the finalist in your normal environment. A phone recording with automatic level control cannot establish projection by itself; use it more cautiously to compare phrasing and consistency.
14. Set up a fair comparison
Choose two or three candidates and use the same short excerpts. Record from the same distance in the same room without changing recording settings. Begin with a familiar, sound reed where compatible, then refine the strength for each candidate. The ligature must fit the mouthpiece and hold the reed securely. Alternate the testing order, take breaks and return to your original setup at the end. This helps separate a genuine advantage from novelty or fatigue. Score attack, intonation, tone and comfort individually rather than relying on one overall impression.
15. A practical 25–30 minute trial
Treat this as a flexible schedule rather than a fixed test. Warm up for a few minutes on your familiar setup and note the baseline feel. Give each candidate the same short sequence: sustained notes, quiet entrances, register transitions, articulation and a musical excerpt. After the first round, take a break and refine the reed choice for the two strongest candidates. Reverse the order in round two so that the final mouthpiece does not benefit merely from adaptation. Finish on your familiar setup. If everything feels difficult by the end, fatigue may be affecting the comparison; postpone the decision instead of guessing. A short trial is not the moment to rebuild your entire embouchure.
16. Recording and a listener: hearing beyond the playing position
Playing feel and the sound in the room answer different questions. Only you can report comfort; a recording helps you hear the phrase from outside the playing position. Keep the phone or microphone fixed, stay in the same place and play the same excerpt at comparable dynamics. A phone’s automatic gain control may conceal level differences, so do not treat recording volume as an accurate projection measurement. Label takes neutrally as A, B and C and listen later. Ask a teacher or colleague to describe attack, phrase continuity and tonal balance. “Which entrance is cleaner?” is more useful than “Which sounds more expensive?” Keep your comfort notes too, because a recording cannot reveal the physical effort required.
17. Resistance, fatigue and misleading first impressions
Describe resistance precisely. Is the note difficult to start? Does your air run out sooner? Is soft playing harder to control? The phrase “a resistant mouthpiece” can conceal several different experiences. First repeat the excerpt with a sound reed and checked placement. Then change one variable, such as the neighboring strength in the same reed series. Do not compensate for a poor match by continual squeezing. An unfamiliar profile and persistent discomfort are different experiences, so repeat the comparison after a break. If your old setup suddenly performs worse too, check the instrument and reeds. A specification chart cannot diagnose every problem remotely, and a more expensive mouthpiece does not guarantee a solution.
18. Beginners and experienced players
A beginner needs predictable response that supports learning without unnecessary tension. Agree on a starting setup with a teacher rather than buying a large opening to “grow into.” Experienced players can assess an upgrade against specific demands: orchestral blend, solo accents or a long rehearsal. In either case, reserve part of the budget for suitable reeds and a ligature if the existing one does not fit. A more expensive model earns its place by providing useful control and results. A famous player’s name on the box does not guarantee compatibility with your playing approach.
19. Budget for the complete setup
The mouthpiece price is only part of the expense. Include suitable trial reeds, a possible replacement ligature and a protective cap. Check what the exact reference includes: an accessory shown in a photograph is not necessarily supplied in the box. Avoid exhausting the budget on a model without leaving room to find an appropriate reed. If your current setup is comfortable, compare the likely benefit with a lesson or instrument service. This is not a universal spending order; it is a way to identify the actual limitation. Pay more for a useful advantage in a specific task, such as reliable entrances, suitable balance or rehearsal comfort. Price itself is not a tonal specification.
20. Used mouthpieces and refacing
Assess a used mouthpiece as an individual example. Request clear photographs of the tip, side rails, reed table and tooth-contact area. A scratch on the outer body is different from damage to a delicate rail. Ask whether it has been refaced, who changed the facing geometry and which measurements now apply. After modification, the model name no longer guarantees factory opening or curve length. Do not judge quality solely by shine or material discoloration. Agree on inspection and trial arrangements and ask about care. If the seller does not know the history, account for that uncertainty in the price and decision. Predictable specifications can be more useful for a first learning setup than an interesting purchase story.
21. A practical final decision sheet
Make a small decision sheet with five criteria: quiet starts, articulation, evenness across registers, dynamic flexibility and comfort after sustained playing. Write a brief observation for each instead of one vague overall score. Mark the two qualities most important in your own music. A candidate that wins only on a secondary point may not justify a purchase. Do not search for a mouthpiece without any compromise; understand which compromise you are accepting. Check whether the result repeats after a break, and play the old setup again. If the difference disappears, take more time. A new combination that consistently helps with specific phrases without introducing new difficulties provides a stronger reason to change than model popularity. Keep the notes for future reed selection so that your next search does not start from zero.
22. Before buying: inspection and a concrete example
Inspect the tip and side rails and confirm accessories and trial terms. For a used example, ask whether it has been refaced; factory charts may no longer describe it. Keep the complete model name and reference. One catalogue example is the Vandoren AL3 Optimum, SM711, for alto saxophone: the manufacturer specifies a 1.52 mm tip opening and medium-long facing. It is a concrete comparison candidate, not a universal choice for all saxophones. A purchase earns its place when your regular repertoire feels controlled, with the required response and without unnecessary fatigue.
23. Model in the SoundsGood catalogue
24. Sources
Additional official sources: Vandoren AL4 · Vandoren A6 · Vandoren Technical Elements.