Playing position, keywork, high F-sharp and choosing the Yamaha YTS-280 alongside the 26 and 480 models.
Key specifications
| Model | Yamaha YTS-280 |
|---|---|
| Type | Tenor saxophone |
| Key | B-flat (B♭) |
| Finish | Gold lacquer |
| Auxiliary keys | Front F; F♯ |
| Specified mouthpiece | Yamaha 4C |
| SoundsGood item number | 31178 |
The 280 tenor in a learning programme
The YTS-280 is a B-flat tenor in Yamaha’s student range. Consider it for individual lessons and ensemble practice when tenor is the voice you want. Compared with alto, the choice involves more than tonal preference: dimensions, the way the instrument hangs and sound production all feel different. Try it standing and seated if both positions occur in your lessons. Notice whether you reach forward for the mouthpiece or lift the body with your hands. A suitable strap helps place the instrument, after which you can assess movement comfortably. A photograph cannot answer these questions.
The standard model’s construction
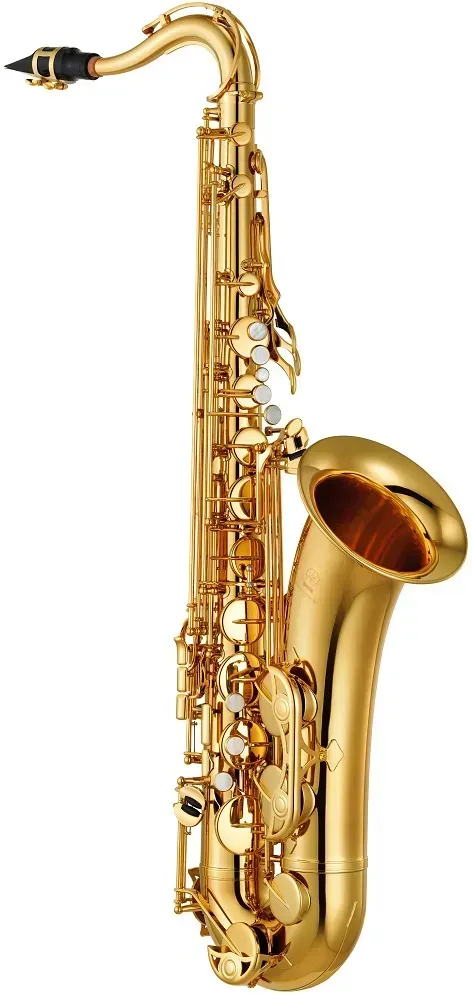
The standard YTS-280 has gold lacquer, a 280-style neck and a two-piece bell. YTS-280S denotes the silver-plated option, making the suffix relevant when ordering. The specification also lists an adjustable thumb hook and polyester key buttons. These identify the model but do not describe every aspect of playing comfort. Thumb-hook position, for example, needs assessment alongside strap height and access to the right-hand keys. Do not try to correct an awkward overall instrument position by changing one component alone. Start with a comfortable position, then refine the setup with a teacher or technician.

High F-sharp and further learning
The YTS-280 provides Front F and a separate high F-sharp key. When comparing it with the YTS-26, this is a specific difference that the official tables establish. An extra key does not produce the upper register automatically, however. Air control, coordinated fingering and methodical teaching still matter. Start a first trial with the middle range, even octave changes and familiar transitions. Assess higher notes within your current ability. If buying for several years of lessons, discuss which additional fingerings the later programme will use. This turns a specification into a practical selection criterion.

Keywork and quiet low-note starts
The official close-ups show key posts, the lower mechanism and construction details used in the series. Yamaha particularly notes the improved low B–C-sharp connection. During playing, check whether a note can begin quietly and repeat reliably, not just whether it sounds loudly. Use the same short pattern for comparisons and avoid changing reeds halfway through unless necessary. If the result varies, test another sound reed as a separate step, rather than attributing every difference to the body. When an experienced player encounters the same difficulty, request a sealing and adjustment check instead of learning to press the keys excessively hard.

Case and the practical routine
The specification includes a 4C mouthpiece and case. Transport deserves attention with a tenor: you need to carry it to lessons and rehearsals as well as hold it during playing. Inspect the actual case’s handles, catches and compartments. Ask how the neck and mouthpiece pack without pressing against the body. If you use public transport, assess the complete package rather than the saxophone alone. Include time for assembly, reed preparation and packing after practice. An instrument that fits your everyday routine is easier to use regularly, and regular use is what makes a learning purchase worthwhile.

A useful playing trial
Prepare a short programme to compare two saxophones: sustained middle-register notes, a slow scale, a few quiet low-note attacks and a familiar melody. Begin at a comfortable tempo rather than at the limit of your technique. Keep the same mouthpiece and a sound reed when they are compatible with both instruments. Changing several components together makes the result difficult to interpret. Record both trials from the same distance without reverb or automatic gain, if your recorder lets you disable it. Note how the keys feel separately: a listener will not hear an awkward little-finger movement, although it can matter greatly in daily practice. Finish by repeating the opening passage to distinguish the attraction of something new from a repeatable improvement.
Comparison with the 26 and 480
The YTS-26 offers another student configuration with Front F and nickel-plated keys. The YTS-480 adds keywork features and different scope for later neck choices. Assess the YTS-280 against your requirements rather than treat it as an automatic compromise between them. If high F-sharp matters and you do not yet intend to use the 480’s additional options, the 280 is a logical trial candidate. If particular left-hand transitions matter, or you already have experience comparing necks, take time to try the higher model. Comfort, condition of the actual instrument and total cost of a practice-ready package should guide the final decision.
Checks to make with the seller
Before paying, confirm the complete model designation, finish and contents of the particular package. Ask the seller to demonstrate how the instrument fits in its case, where the neck and mouthpiece are stored and whether closing the lid puts pressure on the keys. For a remote purchase, photographs of the actual instrument and confirmation of a mechanical check before dispatch are useful. Consult the product listing for price and availability, which can change independently of this review. Budget for reeds, an appropriate swab and a comfortable strap or harness. With a first instrument, lessons and a sound initial setup offer practical value from the first week; avoid spending the entire budget on a more expensive body alone.
View the product, price and availability at SoundsGood
Editorial review based on Yamaha documentation. The cover is an illustration; instrument and detail photographs come from the SoundsGood catalog and manufacturer materials.